SLP CHRISTMAS HOP: Fill your Therapy Bag with Free Holiday Materials!

Tuesday, December 12, 2017 No comments
The winter break countdown is on. SLPs everywhere are the busiest elves I know, delivering evals and IEPs wherever they go. I don't know about you, but my typing fingers are on overdrive trying to get it all done. 


This is where some of my SLP blogging buddies and I step in to help you out with some free speech therapy materials to spread holiday speech therapy cheer through a collaborative freebie hop. Simply download these 7 freebies and you will have one large Christmas themed speech therapy packet to meet many of your students' needs! I love having all of these awesome materials at my fingertips for my mixed groups! 

Oh yeah, did I mention that they are literacy based? SLP swoon. Yup, my friend The Pedi Speechie came up with another innovative Frankie story to the tune of Rudolph the Red Nosed Reindeer as the anchor to the therapy activities. 

I chime in with WH questions that you can use as is or attach to clothespins for students to attach to answers displayed around the wreath. I love to throw them in a sensory bin along with some plastic frogs.


When you download the WH Questions Freebie, you will also find links to the coordinating freebies from these fab SLPs:

The Pedi Speech starts us off with her Holiday Hop story featuring our favorite frog Frankie
Speech Wonderland gifted some Category Treats 
The Speech Owl provided Phonemic Awareness activities
Speechasaurus provided Articulation Chains
The Speech Attic provided activities targeting Basic Concepts
Sparklle SLP includes Story Visuals and Reinforcements (like smash mats!)

I hope that these freebies fill you SLP Santa sack with fun to carry you through to Winter Break. 
You can make it!


From Little Seeds Grow Mighty Trees

Monday, October 23, 2017 No comments


From little seeds grow mighty trees.

What we do today impacts what our students do tomorrow. No pressure, right?

When we work together with students and families, our impact increases. You can read more about the how and why I have this tree in my classroom here. In the meantime, let's get to how I made it, shall we?

Being the frugal resourceful SLP that I am, I was determined to make this project happen with minimal cost. Initially I thought I would make it using an artificial tree. Then I spotted the price on them-- yikes!

Insert Plan B.

The first thing I did was take my boys back to a wooded area behind my house to scope out our "tree". We hunted around until we found the perfect branch. However, our luck didn't end there. We also found an abandoned wooden toolbox. The perfect base for our project!! We checked with our neighbor whose son had abandoned the toolbox he had created in boy scouts and got the green light to use it. Awesome!


A little white spray paint and our perfect branch was ready to go!

I then busted out my trusty Cricut machine to add vinyl lettering to the toolbox. Vinyl and I are BFFs you know...


As in any DIY project, safety comes first so my son was well protected with his hockey helmet as he drilled into the toolbox. He loved every second of it.


Now, onto the mason jars. My daughter helped me design mason jars that we could adorn the tree with, highlighting my students' strengths from their perspective. We used floral wire to create a hanger for various sized mason jars. 


I just love how the final project turned out.  My students love showcasing their strengths and reading the positive messages that their parents leave them on the attached ribbons! You can read more about how they are used in my speech room here. You can download the mason jars here.


Student and Family Relationships Come First


Relationships come first. Establishing strong, authentic relationships with my students and families increases the value that they place on improving their communication skills. This in turn, positively affects their progress. 


Working in an urban, low SES school presents its unique challenges with parents/guardians who may not have the same knowledge on how to help their child communicate as we do as SLPs. Acknowledging the parent’s role and establishing a positive partnership with families cultivates that dialogue. 


Providing personal touches as small as offering a water bottle at meetings, making positive phone calls or sending notes home go a long way. When I meet with parents, they write a message to their child on the back of a ribbon. 


We hang it on a tree branch displayed in my room to illustrate our home-school connection. The students then write their favorite part about themselves on a mason jar tag that we attach to the ribbon. 
(You can find the mason jar tags here).


After reading his father’s message, this student filled out his mason jar with such a sweet response. We tackle what is hard for our students but encouraging words help them know that we are rooting for them every step of the way. 


You don't need to spend a small fortune to create the tree that I described above. Learn how I made mine for less than $5 here.


Spread the Love with Your Bulletin Board

Saturday, August 26, 2017 No comments


When designing the bulletin board in my classroom, I wanted to use photographs in an inspirational way for my students. My district has an initiative to demonstrate pride for the city that it is in so the two came together perfectly with this one.

I loved the idea of creating a bulletin board that would inspire my students to think of speech when they are outside of my speech room. Using visuals on my bulletin board helps my students do just that. When they are out and about around the school or community, they make connections between what is in our speech room and the outside world. The more they reference our speech room outside of their speech time, the more they may think about what we actually do in there.


I often get asked where I purchased the wooden bulletin board. It is actually just Fadeless Designs Weathered Wood bulletin board paper that I purchased from Amazon. I have since spotted it at Michaels, Hobby Lobby and Joann's Fabrics as well for less than $10. Remember to bring along your coupons or use a coupon app to save even more!

The ruler clip boards were from the Target's Bullseye Playground. I had the burlap ribbon border, twin and clothes pins on hand. I cut out the letters using my Cricut Machine.

HOW TO CREATE YOUR OWN PHOTOS:

First, I took some photos of student hands making a heart above a neon green piece of poster board. The poster board served as a green screen. I quickly learned that this was a lesson in following directions and fine motor challenge for a few of my friends. 

Next, I put out an all call for photos around town. I also took a few of my own on our school campus. The power of teamwork never ceases to amaze me. Our night custodian sent me so many gorgeous photos. I also received a couple from a fellow SLP Blogger, Rock Chalk Speech Talk from when she had lived locally for graduate school. It was awesome!

Using the Green Screen app by Do Ink, I placed the photos that I had acquired as overlays on the heart photos. The beauty of this is that you can do so right from your iPad or iPhone.


To do so, layer the scenic photo on the bottom layer. Then add the hand photo to the middle layer. The image will look as if the hand is in front of the scenic photo. To have the image on the hand, select the rainbow circle on the bottom (this determines which color is washed out depending on the color of your green screen). Typically, I select a bright green. However, this time tap on the hand portion and the photo will appear within the hand. To adjust the opacity, adjust the sensitivity bar.

Once you have saved the image, you can open the image in a photo editing app and convert it to Black and White. I used the app Color Story; however you can also do so by simply editing the photo with your device's built in editing features. I then printed the photos on card stock using my regular printer.

I hope that you enjoyed this tutorial. What bulletin board inspiration tips do you have? I'd love to know. Let me know in the comments below. 


Got Goals? Increasing Student Accountability & Goal Awareness

Saturday, August 19, 2017 No comments
One of my biggest pet peeves is when students do not know why they come to speech therapy. "To play games" just doesn't cut it in my book. Do we ever play games in my room? Absolutely. Not every session, but it does happen. However, that game is a medium to address the specific goals, not the goal itself. Now, I know that you all know that so you're probably thinking I'm preaching to the choir, right? My point is that WE know what the purpose of that game or activity is but do our students?


Having students know what they target in speech-language has always been an important factor for me but a couple years ago I had to take a good hard look at HOW I was doing that. As a token of congratulations for being nominated educator of the year, my sweet SLP colleague compiled a book for me with responses from my students about what they love about coming to speech. The responses truly touched my heart (I may have shed a tear or twenty) but responses that referenced the WHY they came to speech were in the minority. I am a big proponent of self-reflection so I had to take a step back and really think about what I could do to make sure that was in the forefront of their thinking about speech. My challenge? It was important to me to address that in a way that would not sacrifice the strong interpersonal relationships with my students that I hold near and dear to my heart. 

Flash forward to the next year... our SLP assignments were changed and I was now tasked to ensure that my self-reflection of increasing goal awareness took place while also establishing authentic relationships with new students. The solution that worked for me was using Speech Therapy Goal Tags. I'll be honest here... they weren't just helpful for my students but for me as well! Not only were my students learning what their speech therapy targets were, but I was learning what their specific targets were. Particularly for my students targeting language skills, this can be a difficult task.

What I didn't anticipate was how much the students would LOVE the tags. I intentionally made the goal tags in landscape orientation so they would be easy to discern from brag tags that we added. To the students, the tags were regarded as an ID badge. I included a schedule badge to encourage students to come down to therapy independently at their scheduled time. I had to hide my giggles when I would spot a student testing out their badge to see if it would gain them access to the elevator like staff badges do. 

How did they work?

Students were active participants in assembling their goal badges onto their lanyards. This was a great opportunity to talk about what they were working on in speech in a relevant project based manner that held relevance. The badges then traveled with students back and forth from class. They were also a helpful reminder to teachers about what each student was targeting in student friendly "I can" terms. Students took pride in them and would often ask for special permission to take them home and show their parents (ummm... absolutely!). 

I highly recommend trying it out to see how it works for you and your students. You can create your own tags with index cards/cardstock or use the Speech Therapy Goal Tags that I made if you want a print and go option. I added a customizable option as well so you can taylor them to meet your specific needs. 


What works for you? I'd love to hear. Shoot me a message or let me know in the comments below!

UPDATE: Do you want to hear more about using Goal Tags? Check them out in the video below!
(Don't mind the awkward screen shot... thanks YouTube!)

SLP Toolbox Storage

Sunday, August 6, 2017 No comments


I see you working your tail off for your students/clients. I see you supporting your colleagues, sharing ideas and implementing evidence based practice. I see you when you are elbow deep in paperwork and Medicaid billing, wondering when/if it will ever end. I am right there with you. 


I created these toolbox labels to go with the rustic decor of my Fixer Upper Style speech room. As a simple way for me to say THANK YOU for following along, I am sharing them with my newsletter subscribers for free! Not a subscriber, no worries! You can subscribe here.

I know how happy it makes me to have my room set up in the beginning of the year, organized and ready to bring on the new school year. It won't be perfect by any means, but that time I put in at the beginning of the year sets the stage for my year. I hope that this SLP Toolbox will help ease your load, even if just a bit. At the very least, it will make your organizational heart happy to look at as you use it throughout the year.

What tips, tricks or advice do you have for starting the year? I'd love to hear them! Comment below with what works for you.

P.S. If you haven't heard, I am currently moving on up in the world to a larger speech room. I am sharing the journey of my Fixer Upper style makeover with all of you. A picture says a thousand words, so if you would like to check out what I've done so far (bloopers and all), hop on over to SLPTalk on Instagram or Facebook. Before you go though, don't forget about your FREE SLP TOOLBOX DOWNLOAD!

Functional Storage in My Speech Room

Thursday, July 27, 2017 10 comments


Speech Room Decor

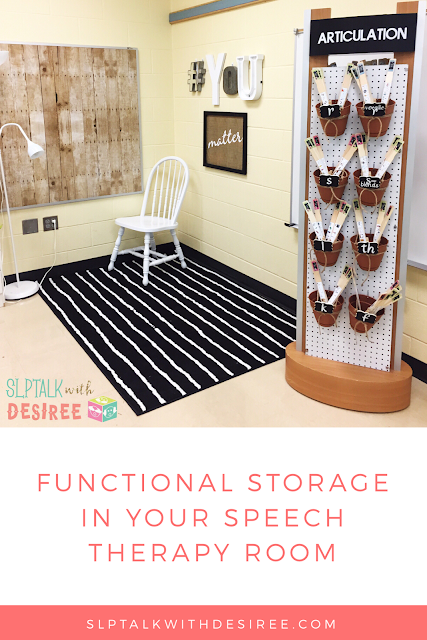
I made a bit more progress on my speech room makeover today by repurposing a display for eyeglasses. I love that it rotates and provides functional decor for my room!

I switched out the existing display with white pegboard that I purchased at Home Depot. They cut it to the exact size that I needed. To go along with my rustic style, I used plastic flower pots from Home Depot that I glued twine onto. They were the perfect size for my needs. I attached chalkboard clothespins found at Michaels to label each flowerpot. That certainly wasn't necessary but having them match the style of my speech room just made me happy. 

Prior to my current display, I have used book bins or the top drawer of a rolling storage cart to store Articulation and Language Sticks. Their durability and having multiple targets on each paint stirrer make them an easy resource for me to grab and go in a pinch. 


Speech Room Makeover

Articulation Sticks are honestly a staple in my speech room. I love having over 1,000 stimulus words at my fingertips to target articulation while also introducing a variety of vocabulary concepts with picture supports. Working with a high risk, low socioeconomic and high ELL population, it is important that I maximize our activities to close that gap. 

Language sticks allow me to further differentiate student needs within mixed groups. Currently displayed are Category Sticks and Describing Sticks.  I am updating my Grammar Sticks so I can share them with you and add an updated version to my collection. If you are interested in learning more about how I use the sticks, you can check out the links below.


Language Sticks in Speech Therapy

Descriptive Language in Speech Therapy


Using articulation sticks in speech therapy


What tips do you have for organizing materials using functional decor in your classroom? I would love to hear!


Fun & Functional Speech Room Decor: SLP Books

Tuesday, July 11, 2017 8 comments


These books were one of the first decorations I put out in my new speech room. Not only do I love the way these SLP books look, I love their function too! I am very intentional about the decor in my room and the meaning that each holds. When I spotted these at Michaels, I just knew they were perfect for what I had in mind!

is for SPEECH. The "S" will house favorite moments as students graduate from SPEECH. I only wish I had started this 17 years ago! When students graduate speech, I will have them write what their favorite memory was in speech and I will write something I love about them. Relationships are huge and anytime I can take the opportunity to share a meaningful connection, I am all in.

L is for LAUGHS. I will write the LAUGHS that I always want to remember in "L". Our job is full of them! What better book to open when you are having a tough day or need to lighten up Medicaid billing? I keep a little "He Said, She said" journal of funny moments with my own kids that we love to look through together. Our "He Said, She Said" journal along with our Thankful Journal are my favorite books in the house.

 P is for PATH, as in the path you take in life. The "P" will include stand out moments with students, families, and colleagues that remind me why I am on this PATH. You know, the ones that affirm that you were right where you were meant to be

I am busy working on my "Fixer Upper" style speech room but will be sure to post the reveal when I am finished! In the meantime, if you love a good DIY project on a budget, head over to Instagram for some behind the scenes action.


Help Me Find My Voice: Where to Start with Students Who Are Non-Verbal

Thursday, June 22, 2017 No comments
Guest Blog Post by Rosemarie Griffin


Working with students with autism or other complex communication disorders can be overwhelming. With the prevalence of autism spectrum disorders being 1 in 68 children, we as speech language pathologists are responsible for helping these students find their voice. As clinicians, we provide the critical guidance that helps students identify, acquire, and use a functional response form.

When we have a student who is non-verbal or limited verbally working on direct instruction of manding or requesting skills is needed. Sometimes a goal for manding is not created, as many of the standardized tests that we use in the field do not test this area of language. Before we discuss strategies for incorporating manding into your student’s day, we first need to outline what manding is exactly.

Manding. A mand is a request. This chart explains this concept more in depth.

ANTECEDENT
BEHAVIOR
CONSEQUENCE
Motivation
Verbal response
Specific to the learner’s motivation
After seeing a cookie            Saying “eat cookie”
Wanting to play iPad             Saying “iPad”
Seeing a book you like          Saying “read book”
Wanting a drink                    Saying “drink”
Seeing a ball                         Saying “let’s play ball”

Below is a detailed explanation of what a structured manding session might look like for a student using an AAC device.

Background:
The teacher is working with a middle school student who is a very early learner. He has not had access to a robust education program, so he is working on acquiring a functional response form. He is currently using a picture exchange system. He is working on using one picture to request wanted items and actions: he takes the desired picture off of the correct category page, puts it on the velcro phrase strip on the front part of his book, and hands it to the teacher.

The manding session takes place at the start of his time spent working one on one with his teacher. The teacher has in her possession some of his favorite things: DVD player, chips, Pete the Cat book, Gatorade, and a slinky.

Manding Session:
Student: Puts his picture book onto the table. Puts the picture of Gatorade on the sentence strip of his picture book and hands it to the teacher.

Teacher: “Yeah, let’s get you some Gatorade.” Pours a small amount of Gatorade into a cup and hands it to the student.

Student: Drinks the Gatorade. Hands the sentence strip with the Gatorade icon on it to the teacher.

Teacher: “Drinking Gatorade.” Pours another small amount of Gatorade into a cup and hands it to the student.

Student: Tries to reach for the slinky.

Teacher: “You want the slinky.” Goes to the toy page in the book and points to the picture of slinky.

Student: Grabs the picture, puts it on the phrase strip and hands it to the teacher.

Teacher: “Here is the slinky.”

Student: Plays with the slinky for 30 seconds.

Teacher: Presents the student with the Pete the Cat Book. “I have Pete the Cat.”

Student: Continues to play with the slinky.

Teacher: “Oh, you want to play with the slinky some more.”

Student: Plays with the slinky for 30 more seconds. Goes to the food page in his book, selects the chips picture, puts it on the phrase strip and hands it to the teacher.

Teacher: “Chips.” Gets a plate and gives the student 3 chips.

Student: Eats the chips. Hands the phrase strip to the teacher again with the word chips on it.

Teacher: “Eating chips.” Hands the student more chips.

Student: Points to the DVD player.

Teacher: Because this is a new mand for the learner, shows the student where this is located in the book and points to the correct photo.

Student: Puts the DVD picture on his phrase strip and hands it to the teacher

Teacher: “Let’s watch a movie.” Student and teacher watch 2 minutes of his favorite movie.


 No matter your student’s age, if they are limited verbally direct instruction with manding is essential. Helping others find their voice is such hard and rewarding work. I hope that when you encounter a student at this language level that you will work directly on manding.

Rosemarie Griffin is a speech language pathologist, board certified behavior analyst and product developer. She is the creator of the Action Builder Cards. To learn more about this manding or to gather information about using applied behavior analysis to help students increase their communication skills, check out her website   www.abaspeech.org or like her facebook page here: ABA SPEECH ON FACEBOOK.